Showing posts with label recipes. Show all posts

Monday, August 15, 2016

The challenge that comes with eating for two and a recipe for pea and mint soup

Pregnancy is a weird and wonderful thing!  
We had our 20-week scan a fortnight ago and saw what seems to be a happy and healthy baby boy moving about on the screen. A baby boy! Imagine that!

That little boy has begun to move about a lot recently. I first felt his movements as tentative little flutterings but lately there have been a few well-aimed wallops! 

I’m beginning to relax into pregnancy a little more now. I don’t know if it was because we tried to get pregnant for so long and to no avail but I’ve found it hard to believe that we're about to have a baby. I still catch sight of myself in the mirror and am startled at the sight of my growing bump. Is that really me, I ask myself.  Is this really happening?

Eating remains something of a challenge and I’m finding that my attitude to food is changing. Before I got pregnant, I used to eat primarily for pleasure, choosing whatever looked good in the fridge and composing a meal from that. Now, I eat much more strategically. I pause to consider whether I’m getting all the nutrients I need (calcium and iron in particular) before I decide what to make for dinner.

I’m also aware that the baby has now begun swallowing amniotic fluid and so can taste some of what I’m eating. I’m desperate not to have a fussy eater on my hands and want to do everything I can to ensure this doesn’t happen. Right now, this means trying to eat as wide a range of foods as possible.
Combine this with my dietary restrictions, my quest to consume enough calcium and iron and the fact that I’m often lacking in energy for cooking at the end of the day and you’ll see why the culinary pressure is well and truly on.

This particular recipe isn’t particularly bursting with calcium and iron but it is full of seasonal summery flavour. On top of that, it’s easy and effortless to make and consists entirely of ingredients that I always have to hand, which is a big bonus for busy mums-to-be (and for anyone who struggles to find the time and energy to make a home-made meal at the end of the day).

Pea and mint soup 
This makes between eight and ten servings.

2 onions, peeled and chopped
1 large floury potato, peeled and chopped (Rooster, Kerr’s pinks, Maris Piper, Golden Wonder and Queens are all good varieties)
2 tablespoons of olive oil
2 litres of vegetable stock
750g frozen peas
A bunch of mint, finely chopped
Salt and black pepper
  • Prepare your vegetables.
  • Sweat the chopped onion and potato in the oil over a very low heat for ten minutes, until the onion has softened but hasn't yet begun to colour.
  • Add the stock. Bring to the boil. Cover and simmer for 20 minutes until the potato is tender.
  • Raise the heat, stir in the frozen peas and simmer for four to five minutes.
  • Remove from the heat, add the chopped mint and purée the soup using a soup wand or a blender. I always do this in stages, tasting as I go. For this amount of soup, I would use at least 10 grams of mint (leaves and stalks). Some of you may prefer your soup to take on a mintier flavour; others may prefer it less so.
  • Finally, I add the salt and pepper. Again, I would urge you to do this to taste. I use at least 3 teaspoons of salt (and 2 teaspoons of freshly-ground black pepper) for this amount of soup but that's my palate, not yours. Start with 2 teaspoons. Stir it in and taste. Add more as you see fit. That's what 'seasoning to taste' is all about.
All sorts of accompaniments go with this soup. I've been eating toasted bread slathered with hummus but those of you on an unrestricted diet might also opt for a bacon sandwich or a cheese toasty. Yum!


Monday, January 18, 2016

A recipe that will come to your rescue: pasta with broccoli, anchovies and garlic

I couldn't tell you how often I've made this for supper. I discovered it in Jamie Oliver's Happy Days with the Naked Chef about 15 years ago and have probably made it more than a hundred times since then. I've adapted the recipe a little to make it OMS friendly but it still tastes as lip-smackingly good as ever.

The flavour combination isn't the only reason this has become one of my go-to recipes. It's also easy and quick to make and I always have the ingredients to hand. 

I've even found that this recipe comes to the rescue if ever I'm hungover. There's something about the carbs in the pasta together with the saltiness of the anchovies and the head-clearing qualities of chilli that make it the ideal hangover buster!

So, here's how you whip up dinner for a hungry woman in the space of 15 minutes.

100g dried pasta (I use wholewheat farfalle)
One quarter of a head of broccoli, stem and all
1 large clove of garlic
4 anchovies
1 tablespoon of olive oil (if your anchovies come in oil, use some of that)
1/4 teaspoon of chilli
Salt and black pepper

  • Bring a pot of water to the boil. Add a generous amount of salt and when the water starts bubbling again, add the pasta. Wholewheat pasta usually takes about 15 minutes to cook, which allows you plenty of time to get everything else ready.
  • Chop the stem off your quarter head of broccoli. Cut off the dried-out end of the stem and any rough edges. Then chop the remainder into one-centimetre pieces. Don't worry too much about being precise. This isn't that sort of recipe.
  • Cut the head of broccoli into small florets and add any chunky stems to your pile of stem pieces. In this recipe nothing goes to waste.
  • You should end up with two piles that look something like this:

  • Chop your garlic as finely as you can.
  • Add the oil, anchovies, garlic, chilli and broccoli pieces to a small saucepan. Cover the saucepan and place over a low heat for seven minutes. I recommend shaking the saucepan about every minute or so to make sure that nothing is sticking to the bottom. If you feel that there is a danger of this happening or that your garlic might burn, add a tablespoon or two of water to the pan to keep the temperature down and make sure your concoction doesn't fry to a frazzle. 
  • Add the broccoli florets to the pan with the pasta in it five minutes or so before the pasta is due to be ready.
  • Then when everything is cooked, strain the water from the pasta and broccoli and toss them both into the pan with the broccoli pieces. Add some freshly-ground black pepper (be generous) and combine all of the ingredients thoroughly.
  • Pour everything into a bowl, making sure that you scrape out every last drizzle of the garlicky, anchovy-flavoured oil at the bottom of the pan. That's where all the real flavour is!
Enjoy!


Friday, January 8, 2016

Good food and box sets - the only way to recover from the excesses of Christmas

Is it just me or are there others out there who think the festive season ought to be renamed exhaustion season? While it was lovely to catch up with family and friends over Christmas and New Year, the endless whirlwind of cooking, eating, drinking, socialising and staying up late wore me out and I'm only just beginning to recover.

The weather probably had its part to play too. Here in Dingle and all over Ireland, it didn't stop raining for days. And by rain, I'm not talking about a light shower. No, we're talking torrential downpours here. This meant that the only time I got out of the house was when I ran to the car to venture to the shops for more supplies or to the pub to meet up with friends!

Nor did I succeed in sticking to the OMS diet 100% of the time. It was next to impossible considering the amount of chocolate and mince pies in the house!
However, I didn't stray too much. I'd taken precautions by preparing batches of OMS-friendly treats such as these cookies and raw brownies so I was able to tuck into those whenever I felt tempted. And I'm very much back on the wagon now, using the power of good food to help me get over the exertions of Christmas*.

One of the dishes I've been cooking a lot lately is this one: spiced cauliflower and leeks with green beans and freekeh.


It's a dish that quick and easy to make. Its seasonal ingredients are affordable and widely available in the shops. It's packed with nutritional goodness. And for anyone who doesn't know what freekeh is, it's an ancient grain with a nutty flavour. Once confined to health stores, it's now stocked in many supermarkets. But don't worry if you can't find it. Feel free to substitute with any other wholegrain. I'd recommend bulgur wheat for its similar flavour and texture.

The following portions serve one.

50g freekeh (or alternative wholegrain)
150g cauliflower, approximately one quarter of a head of cauliflower
100g leeks, approximately one leek
1/4 teaspoon turmeric
1/4 teaspoon cumin
1/4 teaspoon ground coriander
1/4 teaspoon salt
1 tablespoon olive oil
5 tablespoons water
70g green beans
Some chopped coriander

  • Start by preparing your vegetables. Remove the tough stalk from the cauliflower and tear the remainder into small florets. Remove the hairy root from the leek, peel off its tough outer layer and then chop what remains into one-centimetre-long rounds. Top and tail the green beans and cut them in half.
  • Place your freekeh in a pan of salted water and bring to the boil. Simmer for 15 minutes.
  • Place the olive oil in a wok or frying pan (be sure to use one that has a lid). Add the spices and salt. Add the cauliflower florets and chopped leeks and toss so that the veggies are covered in the spicy oil. Add the water. 
  • Place a lid on the wok/frying pan and place it over a medium heat. Cook for 10 minutes, shaking the pan frequently to make sure none of the vegetables are sticking to the bottom of the pan.
  • Five minutes before your freekeh is due to be cooked, add the green beans to the pan with the grains and cover with a lid.
  • Once fifteen minutes are up, toss the contents of the two pans together. Add some chopped coriander and combine thoroughly. Taste and add a touch more salt if necessary.
  • A fried or poached egg makes a delicious addition to this dish.
  • May we all eat this well in the year to come!

* Now that the weather is better, I'm able to exercise more too. Long walks in the fresh air with my always enthusiastic dog Jimmy are just the thing to lift the spirits. And so too are dark evenings curled up on the sofa with the latest season of the Bridge. I'm looking forward to watching Making a Murderer next. Have any of you seen it?

You can also find me on Instagram, Facebook and Twitter 


Thursday, August 27, 2015

Niceoise salad and memories of kindness

Here's another salad recipe but this time it doesn't come with a side order of complaints about the Irish weather. (Lest you think this means the weather has improved here on the Dingle Peninsula; it's done no such thing. We may have spent the past few weeks crossing our fingers for an Indian summer but those clouds have remained resolutely in our skies.)

No, this salad comes with a more personal story...

My partner Richard is quite a bit older than I am and when we first got together, there was some disapproval from our family and friends. With this as background information, you'll understand why I felt nervous the first time I met Richard's mother. By that stage, she was an old lady in her late seventies and I thought that if anyone were going to react in a judgemental way to our age difference, it was going to be her.

How wrong I was. I came to see that Anne was someone who prized love above all else in this world. She immediately saw and understood the strength of the love we shared. Her eyes shone with happiness for her son and from that moment on, she welcomed me warmly into her family.

She prepared a Niceoise salad for us to eat on the evening of that first visit. It was the first time I'd ever tasted this clever combination of green beans, tuna, anchovies, black olives and eggs but it definitely wasn't the last. It's become one of my go-to recipes for simple suppers ever since.

Anne died in 2007 but whenever I make this salad, I think of her and how kind she was to me on our first meeting.

My memory of Anne Smallwood's Niceoise Salad
This recipe feeds two greedy adults (with some leftovers for lunch the following day). Like all salad recipes, it's pretty adaptable. You can add more or less of any of the ingredients, according to your own preference.

400g small baby potatoes
250g green beans
1 medium-sized green pepper
15 black olives, the small puckered ones are best for flavour
250g tuna in olive oil, brine or water
8 anchovies
4 eggs

3 tablespoons olive oil
1 tablespoon cider vinegar
1 teaspoon honey
1 teaspoon Dijon mustard
A pinch of salt


  • Wash the potatoes and place in a saucepan. Sprinkle with salt and cover with boiling water. Simmer over a medium heat until a knife passes through the potatoes with ease. This should take between 15 and 20 minutes, depending on the size of your potatoes. Strain out the water and set aside to cool.
  • Prepare your other ingredients while you're waiting for the potatoes. 
  • Top and tail the beans and then cut them in half.
  • Place them in a saucepan and sprinkle with salt. Add a centimetre or two of boiling water to the pan. Cover with a lid and simmer the beans over a medium to high heat for four minutes or until they are tender but still retain a slight bite.
  • Cut the top off the pepper and scoop out the seeds and pith inside. Cut the flesh into bite-sized pieces.
  • Remove the pits from the olives and cut them in half.
  • Place the eggs in a small saucepan. Cover them with boiling water and simmer over a medium heat for seven minutes. Then place the saucepan in your sink and run cold water over the eggs until they become cool enough to handle. Set aside until it's time for assembly.
  • Make the dressing by adding the olive oil, cider vinegar, honey, mustard and salt to a jam jar, screwing on the lid and shaking the jar vigorously until all the ingredients have combined.
  • Your potatoes ought to have cooked at this stage. You could cut them in three and add them to the salad as they are but I like to fry them in a little olive oil to give them crispy edges. Simply heat a tablespoon of olive oil in a frying pan over a medium heat. Add your potato slices and a sprinkling of salt. Wait for a golden crispy skin to develop before turning each slice over and doing the same again.
  • It's time for assembly. Add the beans, potatoes, tuna, olives and green pepper to a salad bowl. Toss together until they are well combined.
  • Peel the eggs by tapping them gently against a chopping board or counter top until cracks appear in the shell. Carefully peel the shell off the egg and cut each egg into quarters. Arrange the eggs and anchovies on top of the salad.
  • It's up to you whether you dress the salad before it is served or not. I usually serve the dressing alongside and allow everyone to add as much or as little as they like.


Wednesday, August 19, 2015

The sun has gone AWOL - this calls for an emergency panzanella salad

This summer has been a little too Irish for my liking. I know it's supposed to rain in this country but does it have to rain so much that we've only been able to have dinner outside three times in the past three months?
I know we're not supposed to swelter under the sun either but did July really have to be one of the coldest on record? Or did it have to be the case that I never once took a walk on the beach without bringing along a fleece-lined jacket for fear of encountering biting Arctic winds?

This is what my walks have looked like this summer. Nice, I know, but where's the sunshine?

This weather has had consequences. Not only is everyone in Ireland at risk of vitamin D deficiency, we've all started to feel grouchy too. We need some sunshine!

I'm not a miracle worker. I can't compel the sun to shine on Ireland. Nor can this recipe promise to make up for our lack of sunshine. All I can do is assure you that its ripe tomatoes, charred red peppers, wrinkled black olives, salty anchovies and heady fragrance of basil will look, smell and taste just like summer on a plate.


Sharon's thrown-together take on a panzanella salad
The following quantities serve two adults. 
Feel free to adjust according to your own taste. If, for example, you don't like anchovies, just leave them out. The salad will still be full of flavour. It may however need a pinch of salt. 

200g of stale sourdough bread (or any other stale bread you've got lying around)
2 medium-sized red peppers
1 tablespoon olive oil
14 plum tomatoes

6 large sun-dried tomatoes
12 or so wrinkled black olives
6 anchovies 
6 large basil leaves
Salt and freshly-ground pepper 

  • Pre-heat your oven to 200C/400F.
  • Wash the peppers, place them on a baking tray and put them in the oven for 25 minutes. Set a timer for 15 minutes so you can use the oven to toast your croutons for the last ten minutes of cooking time.
  • Remove the crust from the bread and chop what remains into chunks measuring approximately 1.5cm squared. (Don't worry too much about accuracy. This is a rough and ready salad.)
  • Pour a tablespoon of olive oil onto a baking tray, tilting the tray so that the oil covers the entire base. Bung in the croutons. Toss them in the oil and give them a liberal sprinkling of salt and pepper.
  • Your timer should have gone off by now. Place the croutons in the oven and bake for ten minutes. By then, you should have crunchy croutons that still retain a satisfyingly chewy texture in the middle. Your peppers should be ready too - charred on the outside with yielding flesh underneath. Set both the croutons and peppers aside to cool and turn off your oven.
  • All that remains to do is chop up your remaining ingredients and add them to your salad bowl. Chop the tomatoes into quarters. 
  • Roughly chop the sun-dried tomatoes.
  • Remove the pits from the olives and cut them in half.
  • Roughly chop the anchovies.
  • Tear up the basil.
  • Peel the charred skin off the peppers and roughly chop the flesh.
  • Add all of these ingredients to a salad bowl, along with the croutons.
  • Add at least half a teaspoon of pepper (about six twists of a pepper grinder) to the salad. 
  • Use your hands or some salad servers to make sure that all of the ingredients are well combined.
  • Taste and adjust the seasoning to your liking. Depending on the quality of your ingredients, you may need more pepper, a touch of salt or a few more basil leaves. (If you like olive oil, you can drizzle some over the salad. Personally, I don't think it needs it.)


{I know that, like the sunshine, I too have been absent from this blog. My apologies. I hope to check in here on a much more regular basis from now on. In the meantime, I wish you sunshine!}


Friday, February 6, 2015

A good movie, a bad memory and a great cake

I went to the cinema to see The Theory of Everything last weekend. It’s the story of a young woman who falls in love with a young Stephen Hawking and the struggles she faces as they build a relationship, a family and a life together as his body deteriorates and eventually gives way to severe disability.

The two central performances are wonderful and this film is enormously affecting on a personal level. So, I’d recommend that you see it. But I’m not really here to give a film review. I’m here to write about a scene in the film that brought back memories of one of the worst times in my life with MS.

Most of you will know that Stephen Hawking has motor neuron disease, a disease of the central nervous system that leads to progressive disability and ultimately to death. Early in the movie, when he is being tested prior to his diagnosis, he is asked to do a simple task – to touch the thumb of his right hand to each of the fingers on that same hand.

Eddie Redmayne (who plays Hawking) is so convincing at portraying the confusion he feels when he realises he can’t do this.  Later, there’s a look of sheer anguish on his face as he tries to do it again at home. He suddenly understands he can no longer bid his body to do as he wishes. He’s losing control of his physical self.

My stomach churned as I watched this scene and I can feel it churning still. It could have been a scene from my life because my neurologist asked me to complete that same task before I was diagnosed with MS (I suppose it’s a standard diagnostic tool) and I remember the sense of shock I felt when I wasn’t able to do it. Although my brain was thinking the thoughts that had always previously resulted in moving my fingers, I couldn’t make them meet my thumb. My disbelieving eyes saw them miss every time. Despite trying over and over and over again, I couldn’t get them to do what I wanted.

This persisted for the six weeks that the attack lasted. At random moments of every day, I would try to complete the task again only to have my heart sink when I saw that I still wasn’t able to do it.

However, I did eventually recover and was once again able to make my fingers and thumbs do exactly what I asked of them. But I have never forgotten how frightened I felt when I lost control of my body. Sometimes, when I’m sitting at the dinner table or watching TV or being driven in a car, I absentmindedly find myself touching my fingers to my thumb, as if subconsciously reassuring myself that all is still well – that I am still well.

And so far, I have been.

I attribute my continued good health to my diet. And whenever I feel tempted to eat butter, cream and chocolate, I remind myself what it felt like not to be able to use my right hand properly.
I used to have to remind myself of this quite often, especially when I would think of Mary Berry's banana bread - which was once my go-to banana bread in the café and at home. 
But I don't have to control myself with such mind games anymore - at least not when it comes to banana bread. I've come up with a recipe that is not the same as Mary Berry's but it's just as delicious and it packs a much bigger nutritional punch.


I thought I'd share it with you today.
200g mashed ripe bananas* (this will require two to three bananas, depending on their size)
1 tablespoon almond milk
50g olive oil (choose one with a mild flavour)
25g cocoa powder
50g plain flour
1/2 teaspoon baking powder
1/2 teaspoon baking soda
75g sugar
60g walnuts, chopped 
20g banana chips, chopped (optional)
3 tablespoons cocoa nibs (optional - especially if you are strict about OMS)
1 egg

  • Preheat your oven to 170 C/340 F.
  • Line a small loaf tin with some baking parchment. I find that the easiest way of doing this is rubbing a left-over butter wrapper over the inside of the tin, scrunching the parchment into a ball with my hands and then using my fingers to shape the parchment to the bottom and sides of the tin. The scrunched-up nature of the paper makes it much more pliable.
  • Combine all of your ingredients in a bowl and mix thoroughly.
  • Pour into the lined tin and place in the centre of your oven.
  • Cook for 30 to 35 minutes or until a skewer comes out clean.
Enjoy the cake with a cup of tea (and if you can, go to see the movie!)

* There's no such thing as over-ripe bananas. The blacker they are, the better they will be for baking, producing super-moist cakes.


Tuesday, January 20, 2015

The simplest of pleasures


There are times when you come across something so obvious that you can't help but slap your forehead in disbelief. You ask yourself how come you'd never thought of it before.

This is what I found myself doing while teaching a cookery class late last year. We were preparing the ingredients for a Thai curry and because some of the students had never used lemon grass before, I passed a blade (is this what we call a piece of lemon grass?) around the room so that they could all see - and sniff - it up close.

I then showed them how to peel off the dry outside layer, bash the remaining layers with a rolling pin to release flavour and fragrance and then chop it up finely for use in the curry.

At which point, someone piped up that they didn't throw the outer layer away. Instead, they added it to ginger peel and water and brewed a tea.

I immediately stopped in my tracks and did as she suggested, brewing a simple and refreshing cup of tea for everyone.

I've been brewing this tea ever since because not only does it have sharp, clear flavours, I've also found it works wonders on winter colds. A drizzle of honey takes it up another notch in the flavour - and health - stakes too.

So, this blog post isn't really a recipe. It's more of a suggestion. 
The next time you're using lemon grass and ginger, don't throw away the peel.
Put it in a saucepan instead.
Cover it with cold water.
Bring it to the boil and simmer for five minutes. 
Allow to cool. (The flavours will infuse even more)
Reheat for a cup of warming and restorative tea.

A cup of tea: it's one of life's simplest yet greatest pleasures. 


It's up to you whether you choose to strain the peel from the liquid or not. It makes no real difference either way.


Monday, January 12, 2015

The big FAT misunderstanding and a recipe for figgy flapjacks

Fat and the role it plays in our diet and in our bodies has been in the news a lot lately. From the way it's been reported in the media, the current prevailing wisdom is that fat is no longer a culprit in the fight against obesity. We've been getting it wrong all along. The new villains are sugar and refined carbohydrates.

Sigh of exasperation.

There is some truth to this but, as per usual with the way the media pounces on any stories relating to food, it's over-simplified. For years we were told to replace butter with margarine spreads (yuck!) and now we're being told to eat butter to our heart's content. The true nutritional understanding lies somewhere between the two. 

I don't claim to be an expert but because my Overcoming Multiple Sclerosis diet is all about fat, I've done a lot of research into this issue. Based on what I've learned, here's what the general population should know about fat:

1: Saturated fat (the fat found in foods such as meat, cheese, butter, cream, milk and coconuts) is not bad. In fact, a little of it is actually very good for you. But there's the rub: I do mean a little. As always, it's a case of everything in moderation.
(If you've got MS, the advice regarding saturated fat is VERY different but that's another blog post entirely.)

2: Very few of us get enough omega 3 fats from the food we eat. These fats are vital to our body's overall health, especially the strength of our immune system. Most of us know we can get omega 3 by eating oily fish such as mackerel, sardines, salmon and herrings. But with the world's fish stocks under severe pressure and the health and environmental risks associated with eating farmed fish, it may not be possible (or even desirable) for everyone to get their omega 3 by eating fish.
There are other options. Flaxseed and flaxseed oil are both high in omega 3. Flax is grown here in Ireland and it's a sustainable healthy product. Chia seeds and walnuts are good sources too.

3: Sunflower oil, vegetable oil and oils that come in clear plastic containers are generally to be avoided. Although they have been sold as healthy alternatives for years, this is not the case.
In pre-industrial times, oil was perishable. It deteriorated quickly because it reacted to light, heat and air so traders would sell small quantities of oil which would be stored in ceramic sealed containers in the home. 
(You know those pretty ceramic oil dispensers you see for sale in gift shops in the south of France? Well, they had a practical purpose as well as an aesthetic one. The opaque container meant the oil wasn't exposed to light. The seal prevented it from being exposed to air. And the heavy insulation of the ceramic material meant it never got too hot either. It wouldn't go rancid before it could be used. The same thinking is behind the reason why all good brands of olive oil - and other oils - are sold in dark bottles of thick glass.)

So, how come oils can be sold in clear plastic containers, exposing them to light for months on end while they sit on supermarket shelves and kitchen counters? It's because they have been chemically treated so that they are no longer perishable. This is good for the companies who sell these oils but not for the people who consume them. The chemical treatments destroy any health-giving nutrients originally contained in these oils and, in many cases, create dangerous toxins instead.
There's a huge amount of reading you can do on this topic. If you're interested, I'd recommend starting with Fats that Heal: Fats that Kill.

I don't want to turn into a ranting evangelist so I'll leave it at this.
- Saturated fat is good for you IN MODERATION.
- Most of us need more omega 3 in our diet.
- Be careful what oils you use when cooking. Oils that come in clear plastic containers and are able to sit in your kitchen for months without spoiling are not beneficial to good health. 

Now as a thank you for putting up with my lecture, here's a delicious recipe for fig-filled flapjacks. It's packed with good fats and naturally unrefined sugars.

The ingredients are simple:
225g oats
2 tablespoons sesame seeds
3 tablespoons pumpkin seeds
60g chopped dried figs
60g chopped almonds
100g walnut oil
75g maple syrup


You will also need a rectangular baking tin measuring 23cm by 28cm (or 9 inches by 11 inches)

  • Pre-heat your oven to 160 C/320 F
  • Chop the figs and almonds.
  • Mix all of the dry ingredients in a bowl.
  • Pour in the oil and the maple syrup and combine all of the ingredients thoroughly using a wooden spoon.
  • Tip the mixture into the baking tin and flatten it with the palm of your hand.

  • Cook in the oven for 25 minutes or until golden on top.
  • Leave to cool in the tin and then cut into 9 squares.
  • Enjoy with a cup of tea or eat as a snack on the go.


Tuesday, November 18, 2014

Comfort eating, vegan style

Our house is right by the sea. There's just one small green field between it and the Atlantic Ocean. It might sound idyllic and sometimes it is. But other times, it can be ferocious.

Here's what it has looked like from my office window a lot lately. 


That's rain lashing at the window. Those are the white crests of waves pummelling the shoreline all along the bay. And that reflected light on the right side of the photo is a lamp on my desk, the illumination from which was badly needed as the sky was dark and heavy with clouds outside. (To shatter your idea of the idyll of living on the coast even further: this photo was taken at 12 noon!)

On days like this, a body calls out for comfort food. But when you're following what amounts to a vegan diet that includes fish, comfort food can be hard to find. (Think about it: don't most of our most comforting dishes include dairy? Mac and cheese, fish pie with creamy mash, apple crumble, chocolate cake - now I'm just torturing myself!)

Thankfully, my experiments in the kitchen have turned up some alternatives that are just as comforting and yet follow the principles of the OMS diet. This vegan cottage pie with North African spicing is one of them. It doesn't try to be a substitute for a classic, it just feels like a whole new dish to enjoy in the dark days of winter.


Vegan cottage pie with Moroccan spicing - serves 4

200g dried green speckled lentils*
500g sweet potato, peeled and chopped into 3 to 4cm cubes
1 red onion, peeled and finely chopped
2 sticks of celery, finely chopped
1 large carrot, peeled and finely chopped 
2 garlic cloves, chopped finely (I used smoked garlic but regular garlic is fine)
1 red chilli, finely chopped
1 large red pepper, cut into 1cm chunks
1 leek, peeled of its outer layers, halved lengthwise and chopped into 0.5cm slices
2 tablespoons rapeseed oil
2 teaspoons ras al hanout*
1 teaspoon cumin
1 400g can of chopped or peeled tomatoes
1/2 teaspoon salt
  • Start by preparing the vegetables (sweet potatoes, red onion, celery, garlic, chilli, red pepper and leek).
  • Pre-heat your oven to 200 Celsius/400 F/Gas Mark 6.
  • Cover the lentils in cold water. Bring to the boil and simmer for ten minutes. Reduce the heat. Cover the pot and simmer for a further 15 to 20 minutes, until the lentils have softened.
  • Meanwhile cook the sweet potatoes. Cover with lightly salted cold water. Bring to the boil and cook for 15 minutes or until soft.
  • Place a large frying pan over a medium heat. Add the rapeseed oil, chopped onion, carrot and celery. Cook for three minutes.
  • Add the garlic and chill and cook for a further two minutes.
  • Add the red pepper, leeks, cooked lentils and spices and cook for another three to four minutes. (If you're using canned lentils, they get added at this point too.)
  • Now add the can of tomatoes and the salt and cook for a further ten minutes. (If you're using whole tomatoes, you'll have to make sure you break those down using your wooden spoon.)
  • Get to work on your sweet potatoes while your lentil mix is bubbling away. Mash them with a 1/2 teaspoon of salt.
  • Taste both the lentil mix and the sweet potatoes to make sure you're happy with the seasoning and then pour the lentils into an oven-proof dish. Top with the sweet potato, spreading it out evenly with a fork.
  • Place in the oven and cook for 20 minutes.

* Tinned lentils work in this recipe too.

* Ras al hanout is a Moroccan spice blend that you'll find for sale in the spice section of most large supermarkets.


PS: Just in case you think living along the Irish Atlantic coast is all about darkness and harsh weather, we get days like this too.


Those days demand a different dinner!


Tuesday, October 21, 2014

An immodestly good cake

I was always good at school and did well in exams. Growing up in the 1980s, the Dingle Peninsula was a much more tightly-knit place than it is today. So tightly-knit that a lot of people were curious as to how well I would do in my Leaving Certificate (the final exam we sit at secondary school and the one that determines our place at university here in Ireland).

I was delighted with my results when I received them. Years of hard work and study had paid off. Yet I was a little confused when various neighbours commiserated with me in the following days.

Where were the congratulations? Why did they think I needed consoling?

My mother was getting the same reaction and was confused too. However, she eventually figured out that it was all my father's fault...

My father is the most modest man I have ever met. Nothing in his being will ever allow him to boast about anything. When people asked him about my exam results, his response was to say that I had done 'alright'. Understandably, they interpreted this to mean that he (and therefore I) was disappointed. After all, proud parents shout about their children's achievements from all available rooftops, don't they? 
That's definitely not the case with my almost-pathologically modest father...

You're probably wondering what this has to do with cake. Well, I'm about to commit a cardinal sin in my dad's book by saying that this is one of the best cakes you'll ever make.

It's inspired by a trip I took to Brother Hubbard Café on Capel Street in Dublin at some stage last year (a café that is well worth checking out if you want lunch or a snack made from quality, Irish and seasonal ingredients the next time you're in town).
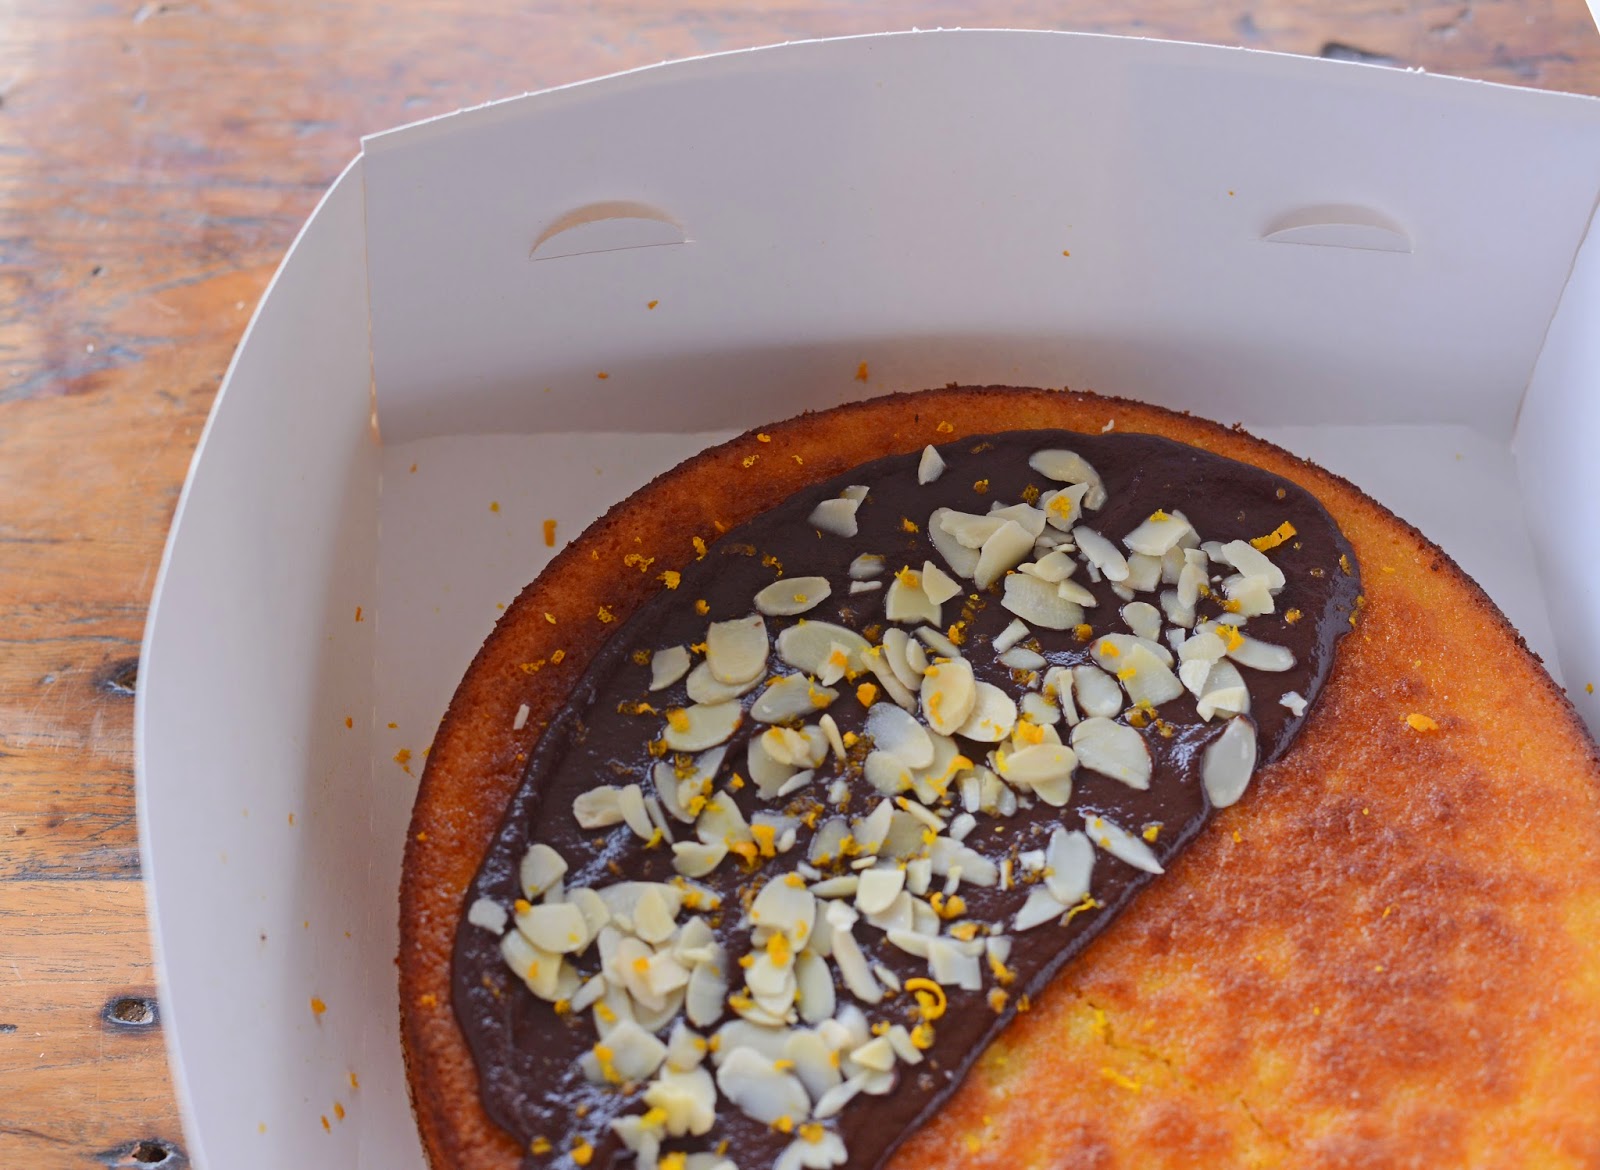
When I visited, I tried their almond and orange buns topped with dark chocolate. These burst with citrus flavour and the chocolate added a touch of luxury. They were moist and gluten free and I immediately set about making my own version as soon as I got home.

After some experimentation, I came up with a cake instead of buns and put it on the menu in my café. It was a hit with customers and (whisper it) I think it's just as good as the buns in Brother Hubbard's. (Sorry for the immodesty, Dad!)
Don't worry: there's a reason why it's only decorated on one side!
Here's what you need to make it:
2 oranges,
5 eggs,
300 grams caster sugar 
250 grams ground almonds 
1 teaspoon baking powder
  • Place the two oranges in a saucepan. Cover with cold water. Bring to the boil and simmer for one hour.
  • Pre-heat the oven to 180 degrees Celsius/350F/Gas mark 4.
  • Butter the base of a 26-cm round tin and line with parchment paper.
  • Chop your cooked oranges. I prefer to do this in the food processor but if you'd like chunkier pieces of orange in your cake, it's best to use a knife. Just be careful you don't lose too much of that precious juice!
  • Beat the eggs and the sugar for approximately two minutes, until well combined and frothy.
  • Add the chopped oranges and beat again.
  • Then add the ground almonds and baking powder and combine thoroughly.
  • Pour your mixture into your prepared tin and cook for 30 to 40 minutes. Check after 30 minutes as some ovens will bake this cake more quickly than others. The cake should be golden brown in colour and set in the middle. An inserted skewer should come out damp, not sticky.
  • Allow the cake to cool in its tin while you prepare the topping.
To decorate:
100 grams chocolate (I find 50 to 60% cocoa best )
60ml cream
Zest of half an orange
Flaked almonds
  • Break the chocolate into a heavy-bottomed saucepan and add the cream.
  • Place over a low heat and stir with a spatula. Don't be tempted to leave the stove while this is cooking. It could burn before you know it.
  • Once the chocolate has melted and combined with the cream into a glossy ganache, remove the cake from its tin and take off the parchment paper. Place on a cake plate and spread the ganache over the top. 
  • Sprinkle the flaked almonds and the orange zest over the ganache and leave to set before digging in.
Some people prefer this cake without any icing at all. They do so for several reasons. The absence of chocolate and cream makes it dairy free. And those who like pure clean flavours enjoy the strong orange taste without the distraction of chocolate.

Because I don't eat dairy and because I was bringing this cake to my sister's house where her daughter also avoids dairy, I only decorated one half of it.

A cake to suit all tastes
However, when we got there, my niece was much more interested in playing with our dog Jimmy than she was in eating cake.


Jimmy and Hannah: besties - at least some of the time!
Meanwhile, the adults got momentarily sidetracked by the prospect of meeting the newest addition to the family, my one-week-old nephew Conor.


Can you believe anyone's hand could be so small?
The lure of the cake did eventually drag us back though. It's that good! 
(Sorry, Dad!)


Tuesday, October 14, 2014

Bye bye Dingle Food Festival and the last days of summer. Hello winter and French onion soup.

Phew! The whirlwind that was the Dingle Food Festival is finally over and having baked hundreds (upon hundreds) of cupcakes, brownies and sweet treats and then manned my stall selling them over the course of three days, my tired body and frazzled mind have eventually recovered.

This year's food festival coincided with a definite change in the seasons. Before the festival, we were still wearing summer clothes and sandals but a storm hit on Sunday afternoon. The wind rose. The canopies covering our market stalls threatened to take off and had to be weighed down. Rain poured out of the skies. Thunder and lightening joined the fray. And since then, everyone has wrapped up in their winter woollies.

As the seasons change, so do our appetites. We yearn for foods that comfort, warm and nourish us through the cold days of winter. French onion soup is just such a food. I know there are lots of recipes for this soup out there but this one is suitable for my diet (and therefore for vegetarians and vegans too). It's not quite the same as the classic version that uses beef stock but rest assured that it's just as delicious!


This soup is traditionally served with melted cheese toasts but because I can no longer eat dairy, I find that anchovy toasts made an equally savoury accompaniment. The deep saltiness of the anchovy works really well against the sweetness of the onions.


French onion soup
6 large yellow onions, thinly sliced
3 tablespoons olive oil
¼ teaspoon of sugar
2 cloves garlic, minced
8 cups/2 litres of vegetable stock
½ cup/125ml of dry vermouth or dry white wine
1 bay leaf
¼ teaspoon of thyme
At least one teaspoon of salt and lashings of freshly-ground pepper

At least one slice of good bread and two anchovies per person
  • Place a heavy bottomed saucepan over a medium heat and add the olive oil. Add the olive oil and then the onions.
  • Sauté the onions for ten minutes.
  • Add the sugar to help with the caramelisation process.
  • Sauté for a further 30 to 40 minutes, stirring occasionally. Essentially, what you want is for your onions to be browned, but not burned.
  • Add the minced garlic and sauté for one minute.
  • Add the stock, vermouth, bay leaf and thyme. Partially cover the saucepan and stir until the flavours are well developed, about 30 minutes.
  • Season with salt and pepper. You'll have to trust your judgment on this. Add the teaspoon of salt and several grindings of pepper; mix; then taste. Add more if you think it will benefit the soup. Remember that salt works by bringing out flavour so a little extra might be just the thing.
  • To make the toast, brush the slices of bread with a little olive oil and toast both sides under a hot grill. Lay the anchovies on top and cut into soldiers.
  • Enjoy


This makes more than two litres of soup but I've found that you can almost never make enough soup. Having a pot on the go means that you're sorted when it comes to quick weekday lunches and snacks and most soups - especially this one - benefit from sitting around for a day or two. The flavours get deeper and richer and better and better.

Wednesday, June 25, 2014

A simple dish to make me better

I haven't been feeling all that strong lately. In fact, if I'm being truly honest, I've felt weak and unable to face the world and its challenges.
My health has been fine (thankfully) but I've taken a few emotional knocks and as a result, I've lost some of my zest for life. I've retreated into myself as I redefine who I am and what I want from what I know (deep down) is a wonderful world of opportunity all around me.

I turn to comfort food when I feel like this. Not comfort food as in chocolate; comfort food as in a bowl* of something nourishing that truly gives my body what it needs. Knowing that my physical body is being looked after allows me to divert my energies to improving my emotional and mental health.

This is food that makes me better.


Soba noodles with grilled salmon and spring onions in a ginger broth

Broth ingredients: (this will make much more than you need for one serving but lasts well for a few days in the fridge and freezes well too)

4 tablespoons freshly minced ginger
3 medium sized cloves of garlic, very finely chopped
2 litres of water or vegetable stock
3 to 4 tablespoons of soy sauce

Other ingredients:
150g fillet of salmon per person
3 spring onions
50g soba noodles per person 
1/4 teaspoon toasted sesame oil
  • Begin with the broth. Mince the ginger and chop the garlic and add to a heavy-bottomed saucepan over a medium heat. Add a tablespoon of water to the ginger and garlic and stir for three to five minutes or until the ginger and garlic have softened but haven't yet changed in colour. Add another tablespoon of water if needs be to prevent the mixture sticking to the bottom of the pan.
  • Add the water or vegetable stock if using and bring to the boil.
  • Simmer for five minutes and then add your soy sauce. Taste and add more soy if necessary.
  • Set aside
  • Heat your grill to medium. Season your salmon with salt and cook underneath the grill for six minutes on either side.
  • Boil some water and cook your noodles according to the instructions on the pack.
  • Peel the outer layer from the spring onions and cut into 4cm lengths. Then cut in four lengthwise.
  • Drain your noodles once cooked and coat in the sesame oil.
  • Place these at the bottom of the bowl. Place the salmon fillet on top. Pour over the ginger broth and garnish with spring onions. 
*In a complete aside: don't you agree that for food to be truly comforting, it should always be served in a bowl? Why is that, I wonder.  


Follow on Bloglovin